Securing Your Zoom Virtual Classroom
Zoom offers a number of tools to control your meetings and online classes to help prevent disruptions and unwanted participants. Below are some suggestions that you may use to help protect your virtual classroom from "Zoombombing".
Before Your Meeting
Change Screen Sharing Permissions
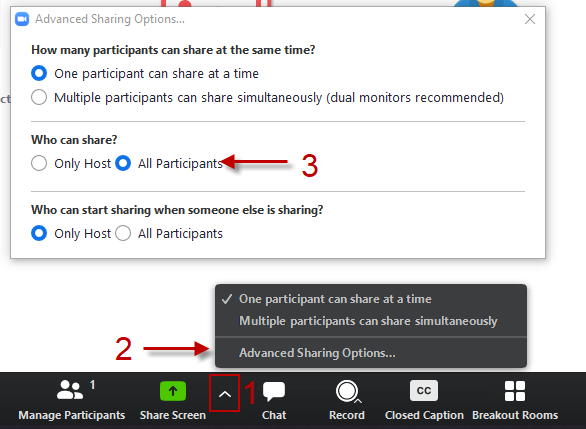
You can prevent other users from sharing their screen and hijacking your meeting by logging into your Zoom account at uhd.zoom.us and going to Settings on the left side of the screen. Once you're there, look for the Screen Sharing setting. It's recommended that you change "Who can share?" from "All Participants" to "Host Only" so that only you will be able to share your content.
However, if students need to share their work with the group, you can allow screen sharing in your meeting controls. Click the arrow next to Share Screen and then select Advanced Sharing Options to edit the screen sharing options for that meeting.

Enable Waiting Room
The Waiting Room allows you as the host to decide when participants can join your meeting. When enabled, participants joining your meeting will be put in the Waiting Room where you will be able to admit them to your meeting one at a time or all at once so that you can filter out people who aren't supposed to join. You can also enable it per meeting in the Meeting Options when scheduling your meeting.
If you go to your account settings by going to uhd.zoom.us and opening Settings on the left side of the screen, under In Meeting (Advanced) you can choose whether your waiting rooms send everyone to the waiting room or just people who are not signed into Zoom.
Important Security Settings When Scheduling Zoom Meetings
The following settings are available when scheduling or editing a scheduled meeting.
- Require Registration
- Scheduling a meeting that requires registration will allow you to have your participants register with their e-mail, name, and questions.
- Only Allow Authenticated Users to Join
- This setting will require that anyone joining your meeting be signed into their Zoom account before they can enter.
- Use a Random Meeting ID
- It's best practice to generate a random meeting ID for your classes instead of using your Personal Meeting ID. Recurring Meetings will use the same meeting ID for each recurrence so that you do not have to re-send the link to your meeting each time.
- Create a Meeting Password
- You can create a password for your meeting and post it in your Blackboard Course or email it to your students.
- Disable Join Before Host
- This prevents your students from joining your meeting before you start it. Students will be kept on a waiting screen until you start the meeting.
During Your Meeting
Lock Your Virtual Classroom
Once all your students have joined your meeting, you can lock the meeting to prevent new users from entering, like locking your door after your class has started. To lock your meeting, first click on Manage Participants in the bottom of your Zoom window. Then, in the participants window, you can select More > Lock Meeting to prevent more people from joining. Once you've locked your meeting, you may also unlock it again by following the same steps.


Restrict Chat
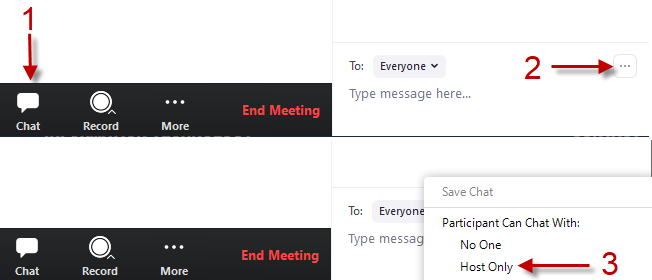
You can restrict chat in your meetings to prevent private messages between students. If you change the chat access in your meeting, you can disable it entirely or change who participants are able to chat with. If you change chat to Everyone Publicly or Host only, students can still ask questions or interact with you through the chat.

Remove a Participant
If there is a participant who is not supposed to be in your meeting, as the host you can easily remove them. To do so, first open the participants menu by selecting Manage Participants. Then hover over the name of the person that you want to remove and click More > Remove to remove the user from your meeting. Doing so will also prevent the person from re-entering your meeting, so it's not recommended that you use this on any of your students.
For additional support, Email TTLCHelp@uhd.edu.
